My photo
AB, Canada
I am fortunate enough to have my dream job of staying at home with my two beautiful daughters. I've been happily married for 6 years and counting! I am a lover of all things french, all things pink, and anything that sparkles. Serioulsy, my husband calls me a crow. I love baking, crafting and throwing big parties, especially if they have a theme. Right now, I'm in love Pinterest. My Hero is Heather from Sprinkle Bakes and my mom.

Tuesday, March 29, 2011

Party Time is Pastry Time


It's no secret that I love second hand stores.
OK, not the actual store so much as the great deals and buried treasure.
Does that make me a shopping pirate?

Cool.

Back to my story!
Salvation army find.
Vintage aluminum cookie/pastry press. 
Still in the box with instructions.
Never used.
$5.99
Arrrrrrr.

And so with gusto I tried out one of the recipes included in the manual.
Eclairs.
But y'all know I tweaked it!


 Here's what you need to make Vintage-y Vanilla Bean Eclairs:

1 cup water
1/2 cup of butter or margarine
1 cup of sifted flour
1/4 tsp. salt
4 eggs


Preheat oven to 450.
Line a cookie sheet with parchment paper.

1. In a medium saucepan, combine water and butter; bring to a rolling boil.
2. Reduce heat to low and add sifted flour and salt.
3. Stir vigorously until mixture leaves sides of pan and forms a stiff ball.
4. Remove from heat.
5. Add eggs one at a time, beating hard after each egg.
6. Transfer to a piping bag or cookie press.
7. Pipe 4" tubes of batter, 2" apart.


I think you could remove the dough from the pan and quickly put it in your mixer to add in the eggs. I did it the way the book said, silly me. I was sure my arm was going to fall off.


Now, I'm figuring that not all of you have a 1950's cookie press....

So you can use a piping bag with a large tip, or even better use a large freezer bag and snip a good 3/4 inch corner off the bottom.


Put in the oven for 15 minutes at 450. Then another 20 minutes at 325.
This worked perfectly!


 Transfer immediately to a cooling rack. Let cool completely then slice in half.


While these are cooling, make your filling and glaze..

Filling:
2 cups of whipping cream
1/2 cup of sugar
1 vanilla bean, seeded
1 tsp. of vanilla extract
 Whip all this until thick and fluffy.

Glaze:
1/3 cup of butter, melted
2 squares of baking chocolate, melted and cooled
1 cup of powdered sugar
1 vanilla bean, seeded
1/2 tsp of vanilla
1 shot of espresso or strong coffee
Mix together until smooth and ribbon-y.


Now for assembly.
I piped the whipped cream onto the bottom part of the eclair, but you could spoon it too.
Top whipped cream with the top half of the eclair.
Drizzle glaze over top.


The last step is to take these to all your friends.

You won't be able to stop eating them.

I sent Ben over to my friends house and to my parents to get rid of them. 
This was after he inhaled 3 in a row!

Monday, March 28, 2011

Bejewelled Eggs

Ben had been gone for a few days last week, framing a house in Pigeon Lake.

This left me with  a lot of time after 7:30 to kill.

I had a few options available.

1. Do something productive. This would include any of your typical house-wifey duties like laundry, dishes, floors, bathrooms......etc.

2. Read a book. Not a magazine, a real live book. I should mention that I love reading, it just takes me longer to get into a story, which is why I love series so much. So I'm trying to start the Lord of the Rings trilogy. Insert push up glasses motion ---->here.

It's a well known fact that I'm a geek. 

You might as well accept it now.

And lastly,

3. Bejewel close to 30 plastic eggs with a 1 lb bag of plastic gems.

The choice was obvious.

But I did manage to incorporate a bit of 'reading' into option 3 as well.

While I stayed up to 11pm two nights in a row, listening to the audio books of Harry Potter....
shuuuut iiiittttt..... 
 I sorted plastic gems and bejewelled eggs until my neck kinked and I had glue gun carpal tunnel.


3 days later they were done!!

And not a burn to be found, although I had a close call with hot glue on my nail bed, which did burn, but didn't hinder my jeweling progress.


I love the glitter eggs that Martha does, but I was happy to make something that was even MORE sparkly and I could call my own.


Wednesday, March 23, 2011

Lemon Meringue Cookies....It IS Spring, Right?


I don't know where you are in the world right now, reading this, but where I am it is NOT Spring.

We have had more snow last week and this week, than we've had all winter, and maybe ever.

That not an actual fact, but it really feels like it.

It takes a lot to tarnish a silver lining in my little world, but dang it!

Mother Nature has some SERIOUS making up to do.

So, to squelch my dark, winter-hating brood I had goin' on, I whipped up some perky cookies.

Here's what you need to make Lemon Meringue Cookies:

1 box of Lemon cookies
1 box of lemon meringue pie mix
6 egg whites
3/4 cup of sugar

Pre-heat oven to 350.

First, follow the directions on the box of the lemon meringue pie mix to make the filling.

Keep filling in a container in the fridge until it sets up.

Make your meringue by whipping your egg whites until soft peaks form, then slowly add sugar, 1/4 cup at a time. 
(don't try and be hero like I did by doing it by hand...)

Whip until stiff peaks form.

Spoon meringues on to parchment paper into cookie sized blobs.

Bake in oven for 10-12 minutes, but watch them closely !


Stir up the set lemon pie filling until smooth, then spoon onto cookies. (or pipe it on :)

Once the meringues are baked and cooled slightly, top your lemon cookies with meringues.

Devour.

I ate 10.


And I don't even like citrus-y things. 

But my mood perked up and the snow just keeps on falling.


Monday, March 21, 2011

Giveaway Winner!!!

First of all, I just want to say a huge thank you to everyone who became a follower and commented, and if you were already following and commented!

I had a whopping 14 entries!

This is NOT sarcasm by the way...I was really floored!

I was actually expecting like my 4 regulars to be the only entries.

Turns out bribery really does work!!

 I loved hearing about your Spring favorites. My favourites were all of you puddle jumpers and gardeners! 

You were getting me all jazzed for springtime....but then there was a blizzard :(

I digress....

OK all!! Here it is, the moment you've all been waiting for!

I used www.random.org which is a number generator, I gave all your comments numbers, based on the first entry to the last one, 1-14.

And the lucky winner of my cupcake kit is.......


#3 -  Which is Stacey!

I will also be sending you an email notification as well.

Congratulations Stacey, I know you will put this kit to great use!

And thank you again, everyone for entering, and I hope to see you back here :)


Thursday, March 17, 2011

Yay!! Giveaway Day!!

OK all, my apologies for not doing a fabulous St.Patty's Day post :( 
Me being part Irish and all, as well as the fact that I live for themes!! 
I just didn't have it in me to make a mess of my kitchen/house (you know how I cook right?) cause we had a realtor open house in the morning.

So, to make up for it......I'm doing a GIVEAWAY!!!!! 

Easter themed, of course, seeing as now that St. Patricks Day is pretty much over, I'm ready for the next holiday!

It's a Cupcake Kit. 

3 different cupcake liners
1 jar of matte white pearls
1 jar of THE most gorgeous disco dust, Peony.
2 Piping bags (cause y'all know I like to pipe ev.er.y.thing.) with a large star tip, of course!

All in a cute french/spring-y little box!

I realize that this is a pretty feminine gift, as well it may only appeal to bakers.....
But, what a great first day of spring gift! Or mothers day, or just for no reason! 
So all you men followers.... you can enter too and look like the best husbands ever!

Here's some pics!

This is what you will receive in the mail....

and when you open it up....GASP!
It's Spring in a Box!


Now if this edible glitter doesn't just get you jazzed....


Bunny not included.


All you need to do, is:

1. Become a follower.

2. Leave a comment about what you think the best thing about spring is.

3. Tell a friend....Well that's not really a requirement, but it's nice to share.

I will do a random draw on Monday, the 21st. I will notify you all of the winner by posting, so check back!!

Tuesday, March 15, 2011

Another Lampshade and Another Burn.

Oh man guys! I am so tired right now.
Seriously, I  can hardly keep my eyes open.
The only thing keeping me up is the sound of dreams being crushed on the Dragons Den show and of course my excitement for my 'new' lampshade!

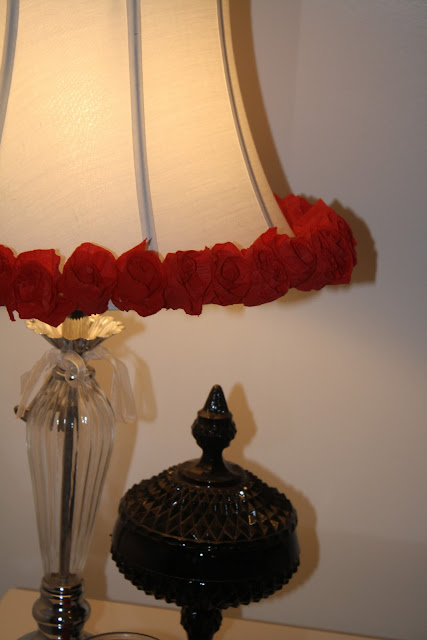
I saw a tutorial on Pinterest on how to make roses from crepe paper or party streamers and I was in!

Here's what you need to make a Crepe Paper Rose Lampshade.

Party streamers, any color and more than you think you'd need. 
Glue gun and glue sticks
1 lamp


Oh yeah, and a loooot of free time, we're talking kids in bed here people.


Here's your standard party streamer, I paid $1.00 a roll. 

Rip 24" strips. Crumple up each strip.

Now un-crumple.

Roll up one end, 4-5 rolls tightly.

Keep rolling, getting looser, but keeping the bottom tight and pinched.

It should really start looking like a rose. Keep rolling....

Tada!!

Now the tricky part. I snipped the pinched part of the rose, and put hot glue on the base (NOT your finger).
Place the flower where ever you want on your shade.

I really wanted to cover the whole shade, but I reeeeaaaaallllyyy  underestimated how long it takes.

I took a whole roll to do just around the bottom of the shade. 
And I now have arthritis. 

But it looks gorgeous!

And romantic too!
Too bad its for the guest room :(


I've now run out of lamps to re-vamp, so you can look forward to a new topic next time!

Monday, March 14, 2011

Seafood Chowder and Saffron Buttermilk Biscuits, Freestyle!


I made this tasty little dish the day before we headed out to our soon-to-be-sold cabin.

It may look hard but it's really easy!

Not 10 minute microwave meatloaf easy, but easy enough.

This chowder is super rustic, and really, anything goes! Hence the 'Freestyle'.

Here's what you need to make Seafood Chowder and Saffron Buttermilk Biscuits.

Hang on tight, it's a long list!

1 large dutch oven or big pot, If you don't have a dutch oven, just borrow your moms like I did :)
4 slices of bacon, chopped up
1 onion diced
4 stalks of celery, chopped up
4 potatoes, diced
1 cup of Vegetable stock or you could use fish stock if you can get your paws on it or pull a 'Martha' and make your own.
3 tablespoons of flour
3 cups of milk
2 jars of clam juice
1 jar of baby clams
1 package of frozen clams
1 package of frozen seafood mix 
(I found mine at Safeway. It had everything!)
Salt and pepper to taste


For the Biscuits:
Preheat oven to 475.

2 cups of flour
1 1/2 tsp of baking powder
1/2 tsp of baking soda
1 tsp of salt
1 cup of buttermilk
1 big pinch of saffron
4 tablespoon of butter, room temperature
1tablespoon of sugar


Fry bacon in large pot until medium-crispy.
Remove fried bacon and set aside.
Saute onion and celery until tender.

Add flour and stir until it gets kind of paste-y looking.

Add in stock to de-glaze, follow with the milk.

Bring to a boil and add the potatoes.
Take it down to a simmer.
When the potatoes are tender, add all the seafood.
Let simmer.


Yes, that's butter on top.
Also, I should have used my large pot, but I like the color of my moms dutch oven. 

OK, biscuit time!!

You can really use any biscuit recipe you like, but this on required no rolling and cutting.
Gotta love drop biscuits!

First add your saffron to the buttermilk and stir it up, letting the buttermilk infuse with the saffron.

Add all the dry ingredients in a medium bowl and add milk mixture and butter.
Mix until combined.
Drop 1/4 cup (or big soup spoon) sized balls onto a lined or lightly greased cookie sheet .

Feel free to send me your aqua Pyrex bowls :)


Voila!! The finished product!

Can you see the steam?! 

Well? Can you?!

Thursday, March 10, 2011

Lucky Vanilla Cupcakes...By who else?! Sprinkle Bakes!

Stacey from I wish I was Martha, got together for some kid-free quality baking time. 
And squealing over edible glitter time.
We  decided to make these Lucky Vanilla Cupcakes from the fabulously talented Sprinkle Bakes!
Don't judge me for squealing until you see the pictures.
There better be squealing where you are!
To see the whole post, Click ------> Here.
To see the fantastic recipe and Click ---------> Here.
Also I'd like to give a great big shout out out to my new friend Lisa over at Flour Confections for having Edible Disco Dust in Canada and charging an arm and leg for it! YAY!
You can look forward to seeing more of her products here for sure!


Wednesday, March 9, 2011

It's 9:30 at night. Wanna make S'mores?

Ben and I have currently been with watching Discovery's Gold Rush.
If you've never watched it, you're missing out.
Well, if you live for confrontation, constant drama and other peoples failures that is.
I don't like these any of these things really, which is why at 9:30pm I decided to make S'more muffins.
Turns out I had none of the essential ingredients.
But our Mac's store did!

Here's what you need to make S'more Muffins:

2 cups of crushed graham crumbs
1/4 cup of sugar
1 1/2 teaspoons of baking powder

1 cup of milk
1 egg
3 tablespoons of honey

1 bar of milk chocolate
2 cup of mini marshmallows or 6 large marshmallows

Pre-heat oven to 350.

Mix first 3 ingredients together in medium bowl.

In a separate bowl mix next 3 ingredients, then add to dry ingredients. stir until combined.

Chop up chocolate into a chunks and toss into batter.
Add and mix in mini marshmallows. If you're using the large marshmallows, cut in half with scissors and add after the batter is in muffin tin.
 Use cupcake liners people! You do not want to wash these tins.

Line your muffin tins with cupcake liners and fill each one 2/3 full.

Bake for 16-20 minutes.

Let them cool. They're way better completely cool, trust me.
I'm the most impatient person on the planet, and even I managed to wait.


Don't you love a recipe where you can get all your ingredients at a corner store for 9 times the price?!

You just know these aren't healthy.
But they are delicious!


Also, this blog now has it's own Facebook page, YAY!
If you'd like to keep in touch, leave comments or even post pictures of your creations you can do it here ---------> Petite Parisian

Thanks!

Tuesday, March 8, 2011

Sea Salt Chocolate Caramel Bars.


I am lazy today. 
Not a suuuuper great quality in a mom of two, that has a house for sale, a blog that needs posting and pins that need pinning!
Oh yeah and a few gallons of laundry that need doing, ugh.
So instead of making homemade shortbread (or doing laundry), I bought it. 

Just on a side note, if any of you shop at Superstore, do you feel drawn to their new products? You know the ones with the sticker that says "Try it....You'll love it" ?
I do. I can't help my self.
I'm powerless against the marketing genius of Galen Westin.

So I bought the Shortbread, and I do love it. Galen - 1, Ali - 0.

Here's what you need to make Sea Salt Chocolate Caramel Bars.

1 bar of Lindt Sea Salt Dark chocolate
1/2 package of Kraft Caramels
1 package of Shortbread bars

Line a cookie sheet with parchment and place a cooking rack on top to catch the drips.

Line up your bars.

Melt your unwrapped caramels in a microwave safe dish. First for 30 seconds, stir then at 15 second intervals until smooth.

Spoon over shortbread bars. 
*Careful! Caramel burns.*


Melt your chocolate in the microwave. 30 seconds, stir, then 15 second intervals until smooth.
Spoon over caramel covered shortbread.

Having the bars on the cooling rack give the bars the 'enrobed' look that chocolate bars have.

Thats it!


Try them...You'll love them!